
Today we`ve launched the public beta of parleys. Not only has the parleys.com homepage completely been redone using flex you now also have an AIR client to download talks.
Go here to register for the beta and let me know what you think.
Category: Flex 2
-
Parleys.com goes Flex and AIR
-
Bits And Bytes With AIR Part 2.
Ok it took a while to work on this but here is part two of my unfinished series “Working With Bits And Bytes In AIR”
I think the formatting (couldn`t get the tabs right in the html) is much better in the PDF and it also contains the first part so i would suggest downloading this if you really want to read it 😉
I`m still making improvements and open to corrections and critics on the stuff i`ve already published as i want this to become valuable so don`t hasitate to write me a mail: benz (@) richapps (dot) de
Download PDF (contains Part1 and Part 2)Bitwise Operators
I will now only briefly go over the different kinds of bitwise operators and concentrate more on those that are especially useful to extract data from packed words. Even if this stuff may first seem to be boring you`ll at the latest realize the power when we dive into the hands on part and start analyzing an mp3. So if you fall asleep during the next pages you can skip them and refer to them later 😉
Bitwise NOT (Complementation)
The sign for the bitwise NOT operation is the ~. The bitwise NOT simply flips the values of the Bits of a word. So all Bits with a value of 0 will become 1 and all 1`s become 0.
Example:
~1011 0110 = 01001001
This is maybe the easiest bitwise operation and in my short live of playing with bits I haven`t found a use case for it (Which does not mean there isn`t one).Bitwise AND
The sign of the bitwise AND is the & Operator. If you have some programming experience you might know the logical AND which uses the sign &&. The AND Operator is extremely usefull if we`re later going to analyze packed words. It helps to extract Bits and to test if certain Bits are set. But for now we`re just going to learn how AND works. The basic rule for bitwise AND operations is that everything times zero is zero. Sounds familiar? Yes it`s the same as multiplication in the decimal world. Here are some examples:
0 AND 0 = 0
0 AND 1 = 0
1 AND 0 = 0
1 AND 1 = 1
You see that only if both Bits are set the result will be a set Bit.
Let`s see how an calculation with two Bytes could look like:1100 1010
& 0111 0110
———————–
0100 0010If you look at the examples you might already see how you can use the AND operator to test if a certain Bit is set. Let’s take the following byte.
0100 1010
If we want to know if the second least significant Bit is set we perform an AND operation with a byte that has just the bit in question set. If the bit was set we should get a byte with just that bit set and all others should yield 0.
0100 1010
& 0000 0010
————————
0000 0010
The second byte we used to test is usually called a mask.
Another useful scenario for using the bitwise AND is the so called bit clearing. For all positions in the bit array you want to preserve you use 1 and for every bit to clear you use 0 in your mask.
Just look at this example:0100 1101
& 0000 1111
———————–
0000 1101It should be clear now how the bitwise AND works and you can see how these techniques can be useful to analyze individual bits in a bit array (packed words). If not don`t worry we`ll work more with it later.
Bitwise OR
Like the AND operator you might already know the logical counterpart of the bitwise OR which sign is ||. The sign for the bitwise OR is just |. The bitwise OR is quite similar as the logical OR. Basically it says that if one or both of the Bits of an OR operation are set the result will be a set bit. Only if both bits equal 0 the result will be 0. So possible outcomes are:
0 OR 0 = 0
0 OR 1 = 1
1 OR 0 = 1
1 OR 1 = 1Let`s check an example of an OR operation with two bytes.
0100 1101
| 0000 1111
———————–
0100 1111
Bitwise XOR (Bitwise Exclusive OR)
The bitwise XOR results in a set bit if both bits of the operation are different. In difference to the “normal” OR operation two set bits will result in 0. So in contrast to the OR operator the XOR operator says something like this: If one (and only one!) Bit of an OR operation is set the result will be a set bit.
0 XOR 0 = 0
0 XOR 1 = 1
1 XOR 0 = 1
1 XOR 1 = 0Left-Shift
Left Shift operation work in the following way:
(bit array) < < (number of shifts) The sign of the Left-Shift Operator is x << y. The Left-Shift operator does what the name implies it shifts the bits to the left by the number of bits indicated by y. On the right site the bits are filled with zeros and on the left site they are just cut of. Let`s check a simple example to get the idea. 1111 1111 << 3 = 1111 1000Note that in Actionscript the < < - Shift operator is meant for use with unsigned (positive and negative values) integers. If you`re sure you deal with signed values only use the <<< operator as it`s meant for use with signed integers. Otherwise it works the same.
Right-Shift
The right Shift operator works exactly like the Left Shift operator only that it shifts the bits to the right. So the last example would look like this:
1111 1111 >> 3 = 0001 1111
Now you have a basic overview of the some bitwise operations. As with the Left-Shift operator there is also a variant for signed values in Actionscript. It`s sign is >>>.
Working with Bits in Actionscript
We`ve covered a lot of stuff without touching Actionscript at all but that will change soon.
There is one more thing we`ve to look at if we want to deal with bits in actionscript. Let me tell you the truth Actionscript doesn`t speak in binary. Ha that was a shock right. You`ve gone through all this and now I`m telling you it`s not going to be useful in Actionscript. Calm down everything I wanted to say is that you cannot simply enter a binary number into Actionscript it will not understand it. Take this example. We try to set an integer to a binary number like so:var myBinaryNumber:int=00000000000000000000000010000001;
Note: Actionscript uses 32 Bits for an integer that`s why I used such a long bit array.
If I trace this out the result is: 10000001
Flash simply cuts of the leading 0`s until the first digit and than takes the rest as a decimal number. You can better see this if we do this:var myBinaryNumber:int=00000000000000000000000010000001;
trace(myBinaryNumber+10); //10000011
So you see it cuts out all leading 0`s and than does a normal decimal addition.
One convenient way to work with numbers in Actionscript is to use hexadecimal numbers as Actionscript understands them if you place a 0x in front of them. I`m sure you`ve worked already with hexadecimal numbers as they are often used to represent color values. So here is just a quick recap on hexadecimal numbers. Hexadecimal is a base 16 number system so in contrast to the decimal base 10 number system, wich uses 10, it uses 16 different symbols (digits) to represent a number. It uses 0-9 like the decimal number system and adds the letters A-F for the other symbols. So A represents 10, B=11, C=12, D=13, E=14, F=15.
Let`s check how we can convert a hexadecimal number to decimal:
A3FB = (10*16³)+(3*16²)+(15*161)+(11*160)= 40960+768+240+11
= 41979
I think it should be clear now how hex numbers work.
Dissecting a packed word
But how will this knowledge about hexadecimal numbers help us in dealing with binary numbers. To show this we will try it out with the familiar color values that we usually write as hex numbers. You may have already applied things like bitshifting and masking to color values to extract the different values for the red green and blue channels of the color. If you`re like me you may have used those techniques without thinking about what`s really going on there. With our new knowledge of bitwise operators, binary and hexadecimal numbers we can now take a deeper looks at what`s going on and it also serves as a first basic example for applying these new tools. A color is usually represented as RGB values were each color channel is represented by 8 bits or one byte. So to represent a color we need all in all 24 bits or 3 byte. In hexadecimal this can be represented by six hexadecimal digits. You`l notice something? Yes one hexadecimal digit can represent 4 bits. That`s because the highest value you can express with one hexadecimal digit is 16 and to represent 16 as a binary number you would need 4 bits. Does that make sense? Look at the next figure to get the relationship.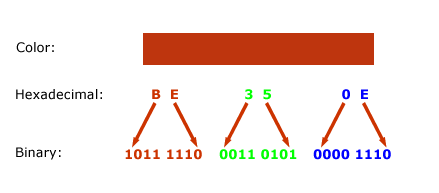
So know let`s apply some bitwise operations to extract the values for each individual color channel (RGB). In order to get the value of the blue color channel we need to somehow get rid of the other values for red and for the green channel. We`ve done this before! Remember bit clearing when we talked about the bitwise AND operator. We`ll use this technique here and create a mask that contains set bits only were our blue channel is encoded, in the least significant 8 bits.
1011 1110 0011 0101 0000 1110
& 0000 0000 0000 0000 1111 1111
———————————————————-
0000 0000 0000 0000 0000 1110Remember that in order to use this mask in Actionscript we have to convert it to hexadecimal. The decimal value of the mask is 255 and that equals to hexadecimal 0000FF. You can also just write FF instead of 0000FF. So in Actionscript we can write:
var myColor:int=0xBE350E;
trace(myColor & 0xFF); //outputs 14
So the decimal value for the blue channel is 14.
Now let us look at the green channel. This will be a bit more complicated. In order to use the same mask we used for the blue channel we will have to shift the bits 8 bits to the left, so that they become the least significant bits. So let`s do that first:
1011 1110 0011 0101 0000 1110 >> 8 = 0000 0000 1011 1110 0011 0101And now we can just apply the same mask as we did for extracting the blue channel
0000 0000 1011 1110 0011 0101
& 0000 0000 0000 0000 1111 1111
———————————————————-
0000 0000 0000 0000 0011 0101And in Actionscript it looks like this:
var myColor:int=0xBE350E;
trace((myColor>>8) & 0xFF); // outputs 53
I think you can figure out now how you can extract the red channel. Here is the Actionscript code for it:
var myColor:int=0xBE350E;
// red channel
trace((myColor>>16) & 0xFF); // Outputs 190
Creating a packed word
Now let`s try it the other way around. We are going to create a color hex string from 3 RGB color values. Let`s say we have the decimal values r=178; g=78; b=100. To combine these three values into one single hexadecimal string we first shift the values into the right position (now using a bitwise left shift) and then combine those values using the OR operator.
var blue:int=100; //No need to shift this one as the blue values will be in the least significant bits
var green:int=78 < < 8; //Shift the green values 8 positions to the left
var red:int=178 < < 16 // Shift the red values 16 positions to the left
Now we combine these values with the OR operator:
var colorHexString:int = red | green | blue
We could also write this all in one line like so:
var colorHexString:int = (176< <16) | (78 << 8) | 100;
Just to make sure you really understood the OR operator I will write down what happens in binary code. Assuming we have already shifted the values into the right place we would have something like this:
Blue: 0000 0000 0000 0000 0110 0100
Green: 0000 0000 0100 1110 0000 0000
Red: 1011 0000 0000 0000 0000 0000So first we combine Blue with Green
0000 0000 0000 0000 0110 0100
| 0000 0000 0100 1110 0000 0000
——————————————————-
0000 0000 0100 1110 0110 0100And now the result of Blue | Green with Red:
0000 0000 0100 1110 0110 0100
| 1011 0000 0000 0000 0000 0000
——————————————————–
1011 0000 0100 1110 0110 0100That`s it. We are now able to create and dissect simple binary words.
Promised next time we start with the real thing and get our hands on real Actionscript and the Mp3 format 🙂
-
Bits and Bytes with AIR Part 1.
Here is part one of the series Bits and Bytes with AIR. It includes the Introduction and basic explanations of terms you`ll find in the world of bits and bytes.
Download as PDF.
INTRODUCTION
When I started with programming back in 1999 (yes flash was my first “programming” experience) I basically saw two paths splitting in front of me. The one was the geeky programmers way were everything was told in 0`s and 1`s and the other was the cool graphic oriented arty multimedia web designers way were programming was just a necessary minor matter and were was a subtle chance to at least have some woman in your lecture courses.
I went well with this attitude throughout the years. I started with flash 5 and there was no real need to get into bits and bytes. From flash 5 to 6, 7 and 8 the pressure was still low. But then in 2006 Adobe released the flash player 9 and with it came new mysterious power in form of the ByteArray class. My first encounter with it was when I studied the Sound Object API and it`s soundSpectrum method. It took quite some brain tweaking until I got it to work but saying that I really understood it would be a lie. While I got worried by this I still did not felt the need to really get into this stuff. But I had the deep feeling that Adobe had a master plan to let us Flash developers down and let “real” C++ or better Assembler programmers take over our beloved flash platform. Then there was AIR and everything changed. I fell in love with AIR from the first minute and only had one problem with it. I had the feeling that the new tool Adobe was giving us was not feature complete. All the apps I wanted to build needed something that was not covered by the new API. After some hours thinking about getting frustrated I realized that the frightening ByteArray class could be part of the solution.
BINARY NUMBERS – IT`S STILL JUST NUMBERS
In our normal live we deal a lot with numbers. The number system we are most familiar with is the decimal number system. The decimal number system is a base 10 numeral system which basically means that we know ten symbols (0-9) called digits to represent numbers. When working with binary data we still deal with numbers but the symbols we have available are less. The binary system only knows two symbols 0`s and 1`s to represent any number. In the binary world those symbols are called Bits. If you`re are not familiar with the binary system you may ask how it`s possible to represent any possible number with just 0`s and 1`s. Counting in binary is very much similar to counting in decimal. In decimal you start counting with the 9 symbols you have like so:
001, 002, 003, 004, 005, 006, 007, 008, 009
When all symbols are used you add one digit to the left and reset the one before to zero. Now you restart incrementing those values.
010, 011, 012, 013, 014, 015, 016, 017, 018, 019, 020 and so on.
This is exactly the same in the binary world only that counting up is faster because we only have two symbols. So it goes like this:
0000, 0001, 0010, 0011, 0100, 0101, 0110, 0111 …
BITS AND BYTES
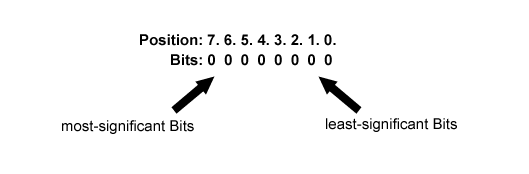
The symbols 0 and 1 that are used in the binary system are called bits in the computer world. A bit is the smallest information a computer can work with. Most of the time when you deal with binary data you will not deal with single bits but rather with collections of bits. Those collections are called a word. Those words can consist of different numbers of bits and the smallest collection used is a byte which consists of 8 bits. Because a Byte has 8 Bits it can describe integers between 0 and 255. There are two ways how to group Bits into a byte. The most common one is called Big-Endian were you start counting on the right site. So the Bits on the right site will carry lower values and the more Bits you go to the left the higher the values. That`s why the Bits on the right are called the least-significant Bits and the Bits on the left are called the most-significant Bits. As said earlier this way of ordering Bits into a Byte is called Big-Endian. The opposite of this is called Little-Endian were the least-significant Bits are on the left and the most-significant Bits are on the right.
In the last paragraph we said that a byte can represent integers with a value between 0-255. Often however we do not treat words as a representation of a number but rather as a container for Bits, were groups of Bits inside this container can carry their own information. Imagine for example you want to store the numbers 15 and 12. To do this you can use two Bytes like this.
00001111 = 15
00001100 = 12
We can see that in those two Bytes the most-significant Bits are not used. In this example 4 Bits for each Number are just wasted. To store our two numbers more efficiently we could rather store both numbers in one Byte like this:
1100 1111
The one who later analyses the Byte just needs to know that the first and the last 4 Bits each represent a Number.
When information is stored into a word like this we speak of a packed word. In order to analyze the content of a packed word we need to have tools to extract individual Bits from a word. When you check out the ByteArray class of the Flash Player you`ll see that the smallest information you can get is a Byte (ByteArray.readByte()). I order to analyze the individual Bits of a word bitwise operations will become a handy tool.
To Be Continued…
-
Article Series: Bits and Bytes with AIR
As promised a little bit fast last week I want to start a series of articles about manipulating Bits and Bytes with AIR.
This is quite a hard task for me because:
– I’m not used to write
– I’m not used to write in English
– the whole Byte/Bits stuff is new to me
– I’m lazy and announcing a series of articles is kind of a pressureAnyway I decided to do it because I think the whole topic really has a lot of potential for AIR and Flex and I hope it can be useful for people like me that have never before worked on such a low level with files. And this is also a chance for me to archive all the knowledge I’ve gain over the last few months.
On the other hand this is an excuse for not open sourcing the code for RichFLV and RichMp3 so far. I hope that this series will enable you to write your own implementation.This could all be a bit boring for real computer geeks and i even cannot promise that these articles aren`t full of mistakes but i hope that your comments will turn it into something useful.
I would like to write this in the form of a book chapter and I will attach a PDF at the end of each new article that will contain all updates and corrections:
Here is a brief overview of what I want to cover:INTRODUCTION
BINARY NUMBERS – IT`S STILL JUST NUMBERS
BITS AND BYTES
BITWISE OPERATORS
ANALYZING HEADERS
CUTTING MP3S
ID3V2 TAG FORMAT
FINDING ID3TAGS
ANALYZING THE CONTENT OF ID3 TAGS
MANIPULATING ID3 TAGS
CONCLUSION
WHAT ELSE TO DO WITH THIS KNOWLEDGE?In the end we should end up with something like RichMp3.
I hope to write a chapter once a week but no promise on this.
I will upload the introduction in the next hour. All comments, critics and corrections are very welcome! -
RichFLV now with autoupdate and drag`n drop
I`ve build in some more AIR specific features into RichFLV and also worked on the SWF export that now includes sound export.
Until now you could export your flv as an SWF but without the sound. I now managed to implement the SoundStreamHead and SoundStreamBlock Tags
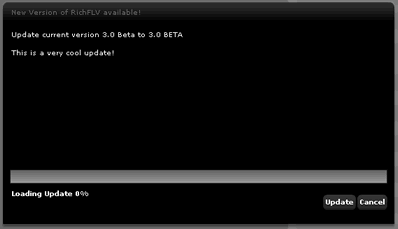
from the SWF Specification. With some flvs there are still problems but most of the time it works fine. Don`t wonder if the SWF export now takes a bit longer i will optimize that later.I`ve also implemented an autoupdate feature. When RichFLV is started it checks automatically if updates are available. If it finds an update it will show you a dialog that tells you something about
the changes in the new version and allows to auto update the app with one click. You can also manually check for updates by clicking the “Check for updates” item in the “About” menu.
One other small feature i`ve included is that if you have a video playing you can drag the video at any point to your desktop and it will make a screenshot from that position on your desktop (as a PNG).

Get the Update:
RichFLV.air -
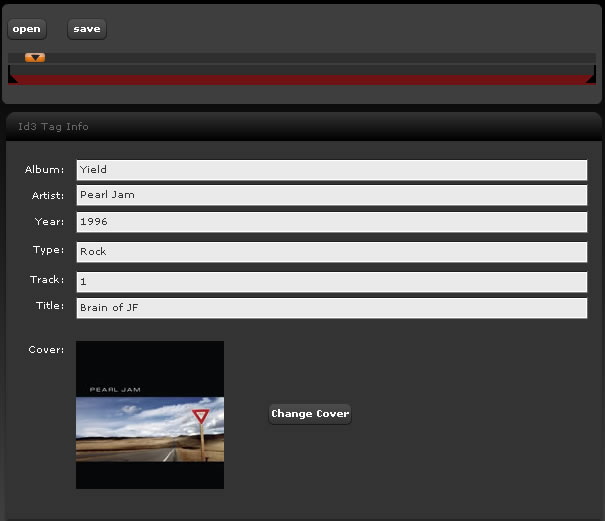
Read/Write ID3 Tags with AIR
I found some time to improve my MP3 library. Now it allows to read and write! ID3v2 Tags.
I`ve not implemented everything but you can read basic information and edit it. You can even select a jpeg or png file that will be embedded into the mp3.
You can still trim the mp3 with the timeline. ByteArray and AIR kicks ass!Check it out here (You`ll need the Adobe AIR Runtime)
Sources will be released as soon as i find the time to clean up the code and implement some more functionality.
-
RichFLV now with mp3 import!
Finally i`ve a version ready with mp3 import. You can now select your favorite mp3 and swap the sound of the flv file with this mp3.
This is not the only big update. Maybe the most important thing are the performance improvements. I completely rewrote my flv classes so that it takes up much less memory and time to process flvs. Now it`s possible to analyze and modify even bigger files. For example with the old version a flv file with 150mb would eat up about 1.5Gb!!! of memory now it takes about 150mb. The only downside is that the export time has been increased slightly but not much. There is still more to find concerning performance but i think this update is quite significant and finaly makes RichFlv a really useful app.
Because i had to rewrite all classes it could be that there are some issues that i haven`t found yet. I`m absolutely busy at the moment and have no time to really test things so please get back to me with your findings and comments.Here is a run down of how to do an mp3 import:
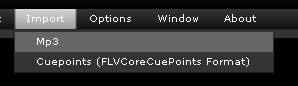
Choose Import>Mp3 and select an mp3 file.
A new Timeline for the sound file will open up. The blue bar represents the flv file. You can drag the bar to alter the timestamp of the mp3.
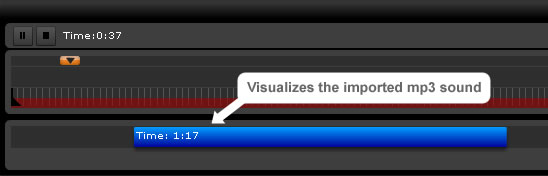
If you want to export your flv with the new mp3 sound click the “Use Mp3 as soundtrack” checkbox. Otherwise the flv will be exported with it`s original sound.
Than just export the flv like before (Export>>FLV). You can now also decide if you want to keep the original sound were your new mp3 is not playing.

I hope this release is useful for some of you. I have so much more things to add in the future but have to make small steps because i only find time for this late at night 😉
But all your comments, ideas and bug reports are very much welcome (benz (at) richapps.de).Download the new version here: RichFLV.air
(You`ll need the AIR runtime. If the file downloads as a zip file just rename it`s extension to air)
-
RichFLV and RichMp3 updated for AIR
I have updated the air files for RichFLV and RichMp3 to work with the AIR runtime.
No new features added just an update to make it compatible with AIR.Get the AIR runtime here.
Download:
RichFLV – AIR Version
RichMP3 – AIR Version -
Editing Mp3s with Apollo
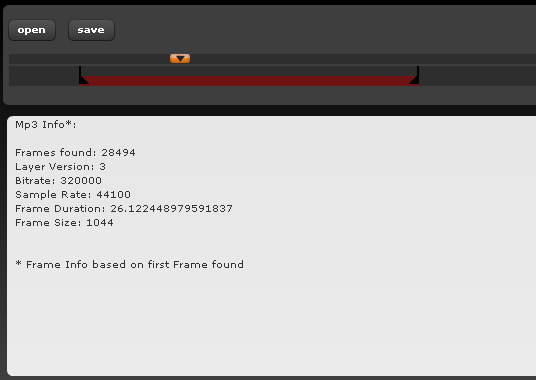
This is just a quick sample app that allows you to cut an mp3 file and get some information about it.
It`s all implemented using the ByteArray class and allows to read the frames and their headers from an mp3 file.
With this information it`s possible to cut the mp3 and create a new one. It would even be possible to merge several mp3 files into one long file.
I`m experimenting with this because i want to enable RichFLV to change the sound and add new mp3 sound tracks to the flv.
You can download my prove of concept Mp3 tool here. (You`ll need the alpha Apollo Runtime) -
RichFLV – Apollo app updated
This is the biggest update to RichFLV since it`s release.
Download RichFLV (Rename extension to .air if it downloads as a zip file)
Download Apollo Runtime (Alpha Version)Here is a brief description what has been changed.
Performance:
The biggest improvement is the performance boost. This version should analyse flvs up to 10 times faster than the old version.
I was able to analyse a 140Mb file also i would not recommend this but files up to 80 Mb should be ok.
The biggest problem currently is the memory consumption. With the 140Mb file my RAM could easily eat up 1GB. I will look into that for a next update.
One thing i will also invastigate is to change the analysis of the flv when it`s loaded. Maybe it would make more sense to do the major part of the analysis when the file is saved.
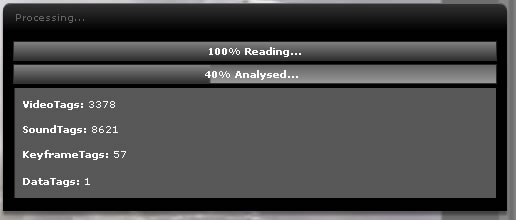
This will keep memory usage low while working on the file and the import would be much faster but than it will take longer to save changes.Progress Information:
I finally found a way to add a progress bar while importing a flv file. I was motivated to do this by the book “The Laws Of Simplicity” by John Maeda.
I can really recommend this book! The progress information is given in two chunks. First it shows how much of the file has been read and than it shows you how much of the flv has been analysed.
While analysing the flv it will also output how many tags of the different kinds (Video, Sound, Metadata) it has found.
New Improved Timeline:
The timeline is now more compact and easier to handle (i hope!?). I`ve build custom components for the sliders because i was not happy with the Slider component.
The keyframe and cutter handling should be much more precise now.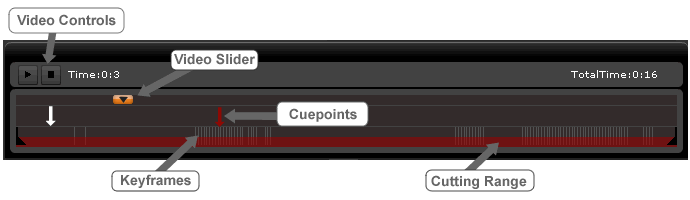
Export Still Image As Jpeg:
I`ve added the ability to export still images from the video player. They will be saved as jpeg files at the moment. Later i will add different formats (PNG,BMP).
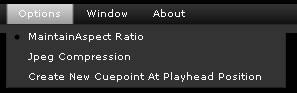
In the options menu you have the ability to change the quality settings for the jpegs.

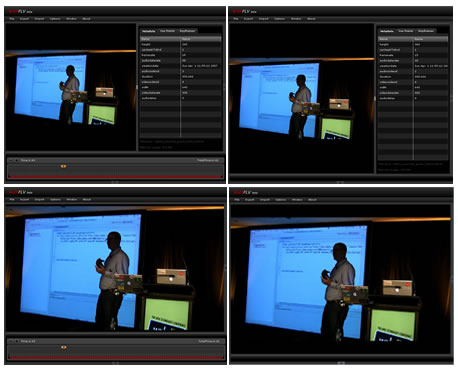
Improved Layout Handling:
You can now hide the info panel and the timeline panel and get different views of the editor.
More Options
I`ve included an option to set the aspect ration handling of the video and one for creating new cuepoints at the current timestamp of the video.
Chrome changed
I have changed the chrome settings from a custom chrome with transparency to the standard chrome because of performance issues.
Espacially when you had the application in fullscreen mode the app became quite sluggish. Now with the standard chrome it behaves much better.
I haven`t noticed a big performance hit with transparency in other apps i`ve build with apollo but when it comes to video this definetely has a huge impact.
Will see if that improves i the upcoming beta of apollo.Please give comments if you like the changes, have suggestions or bug reports.
Download RichFLV (Rename extension to .air if it downloads as a zip file)
Download Apollo Runtime (Alpha Version)